2. Seeing a Simple Site Map in Action
A typical site map can be a little overwhelming at
first glance. But if you keep the previous five rules in mind, you'll be
able to sort out exactly what's taking place.
The following is an example that consists of seven nodes. (Remember, each node
is either a link to an individual page, or a heading used to organize a
group of pages.) The example defines a simple site map for a company
named RevoTech.
<siteMap xmlns="http://schemas.microsoft.com/AspNet/SiteMap-File-1.0">

    <siteMapNode title="Home" description="Home" url="~/default.aspx">

        <siteMapNode title="Information" description="Learn about our company">
            <siteMapNode title="About Us"
              description="How RevoTech was founded"
              url="~/aboutus.aspx" />
            <siteMapNode title="Investing"
              description="Financial reports and investor analysis"
              url="~/financial.aspx" />
        </siteMapNode>

        <siteMapNode title="Products" description="Learn about our products">
            <siteMapNode title="RevoStock"
              description="Investment software for stock charting"
              url="~/product1.aspx" />
            <siteMapNode title="RevoAnalyze"
              description="Investment software for yield analysis"
              url="~/product2.aspx" />
        </siteMapNode>

    </siteMapNode>

</siteMap>
In the following section, you'll bind this site map to the controls in a page, and you'll see its structure emerge.
3. Binding an Ordinary Page to a Site Map
Once you've defined the Web.sitemap file, you're
ready to use it in a page. First, it's a good idea to make sure you've
created all the pages that are listed in the site map file, even if you
leave them blank. Otherwise, you'll have trouble testing whether the
site map navigation actually works.
The next step is to add the SiteMapDataSource control
to your page. You can drag and drop it from the Data tab of the
Toolbox. It creates a tag like this:
<asp:SiteMapDataSource ID="SiteMapDataSource1" runat="server" />
The SiteMapDataSource control appears as a gray box on your page in Visual Studio, but it's invisible when you run the page.
The last step is to add controls that are linked to
the SiteMapDataSource. Although you can use any of the data controls
,
in practice you'll find that you'll get the results you want only with
the three controls that are available in the Navigation tab of the
Toolbox. That's because these controls support hierarchical data (data
with multiple nested levels), and the site map is an example of
hierarchical data. In any other control, you'll see only a single level
of the site map at a time, which is impractical.
These are the three navigation controls:
TreeView:
The TreeView displays a "tree" of grouped links that shows your whole site map at a glance.
Menu:
The Menu displays a multilevel menu. By default,
you'll see only the first level, but other levels pop up (thanks to some
nifty JavaScript) when you move the mouse over the subheadings.
SiteMapPath:
The SiteMapPath is the simplest navigation
control—it displays the full path you need to take through the site map
to get to the current page. For example, it might show Home >
Products > RevoStock if you're at the product1.aspx page. Unlike the
other navigation controls, the SiteMapPath is useful only for moving up
the hierarchy.
To connect a control to the SiteMapDataSource, you
simply need to set its DataSourceID property to match the name of the
SiteMapDataSource. For example, if you added a TreeView, you should
tweak the tag so it looks like this:
<asp:TreeView ID="TreeView1" runat="server" DataSourceID="SiteMapDataSource1" />
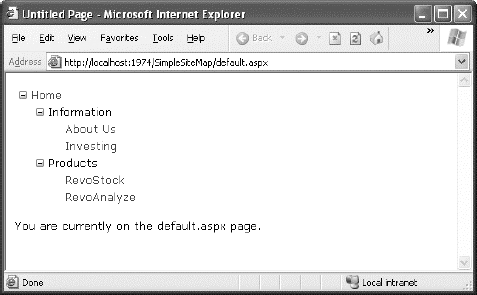
Figure 3
shows the result—a tree that displays the structure of the site, as
defined in the website. When using the TreeView, the description
information doesn't appear immediately. Instead, it's displayed as a
tooltip when you hover over an item in the tree.
Best of all, this tree is created automatically. As
long as you link it to the SiteMapDataSource control, you don't need to
write any code.
When you click one of the nodes in the tree, you'll
automatically be taken to the page you defined in the URL. Of course,
unless that page also includes a navigation control such as the
TreeView, the site map will disappear from sight. The next section shows
a better approach.
4. Binding a Master Page to a Site Map
Website navigation works best when combined with
another ASP.NET feature—master pages. That's because you'll usually want
to show the same navigation controls on every page. The easiest way to
do this is to create a master page that includes the SiteMapDataSource
and the navigation controls. You can then reuse this template for every
other page on your site.
Here's how you might define a basic structure in your master page that puts navigation controls on the left:
<%@ Master Language="VB" CodeFile="MasterPage.master.vb"
    Inherits="MasterPage" %>
<html>
<head runat="server">
  <title>Navigation Test</title>
</head>
<body>
<form id="form1" runat="server">
  <table>
    <tr>
      <td style="width: 226px;vertical-align: top;">
        <asp:TreeView ID="TreeView1" runat="server"
         DataSourceID="SiteMapDataSource1" />
      </td>
      <td style="vertical-align: top;">
        <asp:ContentPlaceHolder id="ContentPlaceHolder1" runat="server" />
      </td>
    </tr>
</table>
  <asp:SiteMapDataSource ID="SiteMapDataSource1" runat="server" />
</form>
</body>
</html>
Then, create a child with some simple static content:
<%@ Page Language="VB" MasterPageFile="~/MasterPage.master"
  AutoEventWireup="False" CodeFile="default.aspx.vb"
  Inherits="_default" Title="Home Page" %>
<asp:Content ID="Content1" ContentPlaceHolderID="ContentPlaceHolder1"
  runat="Server">
    <br />
    <br />
    You are currently on the default.aspx page (Home).
</asp:Content>
In fact, while you're at it, why not create a second page so you can test the navigation between the two pages?
<%@ Page Language="VB" MasterPageFile="~/MasterPage.master"
  AutoEventWireup="False" CodeFile="product1.aspx.vb"
  Inherits="product1" Title="RevoStock Page" %>
<asp:Content ID="Content1" ContentPlaceHolderID="ContentPlaceHolder1"
  runat="Server">
    <br />
    <br />
    You are currently on the product1.aspx page (RevoStock).
</asp:Content>
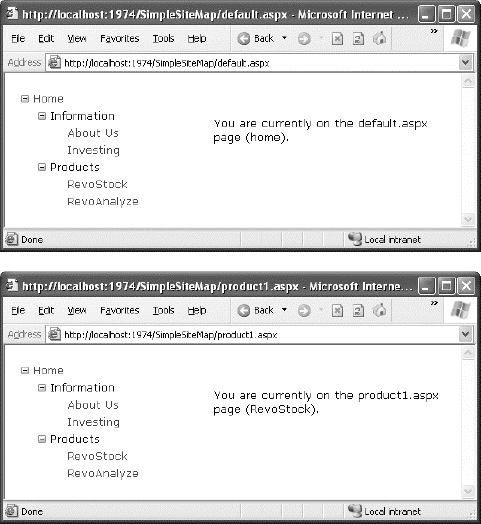
Now you can jump from one page to another using the TreeView (see Figure 4).
The first picture shows the home page as it initially appears, while
the second shows the result of clicking the RevoStock link in the
TreeView. Because both pages use the same master, and the master page
includes the TreeView, the site map always remains visible.
You can do a lot more to customize the appearance of
your pages and navigation controls. You'll consider these topics in the
following sections.